This topic explains how to create, save, open and edit charts. You can do this using the main Charts menu, or directly in the "Selected Charts" pane (see Screen Areas for more information about the different areas of the screen, such as the "Selected Charts" pane).
Here we will look at how to accomplish these tasks directly in the "Selected Charts" pane, via its chart selection options.
>> Using the "Selection Panel"
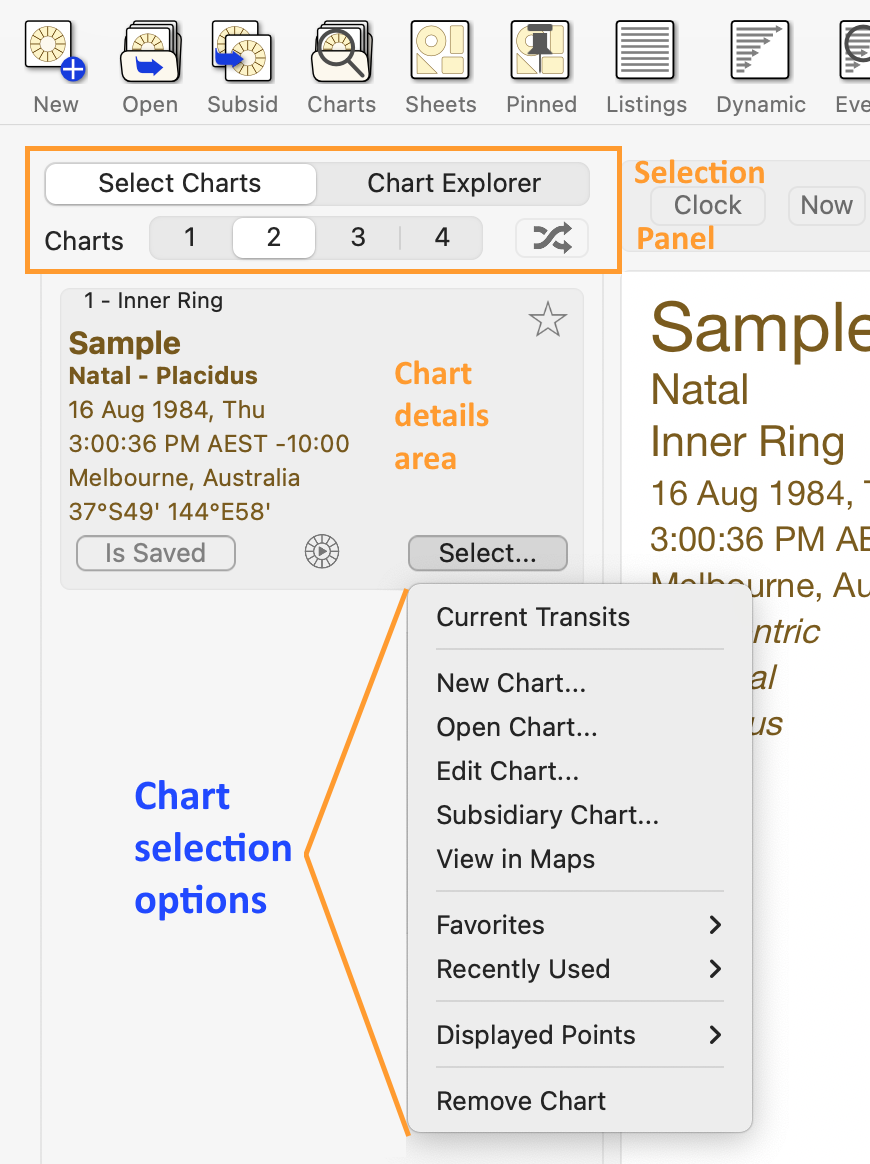
Before you can create, save, open or edit a chart you need to use the "Selection Panel", which is the area at the top of the "Selected Charts" pane (see the graphic below), to set the relevant settings for that pane.
1.Click on the Select Charts button to put the "Selected Charts" pane into Select Charts mode.
2.Click on the number of charts you want to work with: 1, 2, 3 or 4.
NOTE: The same functionality can be accessed on the "View" menu, with the "Selected Chart Count" menu option.
>> Displaying the Chart Selection options
While you can have up to four charts open simultaneously, the basic process of creating, saving, opening and editing charts is the same no matter how many charts you are working with.
You just click on the "Select" button in the "chart details" area of the particular chart (1, 2, 3 or 4) that you are concerned with, and it opens up a menu that is the same for any of the charts. This menu is shown in the graphic below (in this case for Chart 1).
➢ Click on the Select... button in the chart details area for a chart, and a menu will drop down displaying the options for selecting that particular chart. Once you have selected the chart to be used it will be displayed in the "Viewing Area" of the Main Screen. Alternatively to cancel selecting a chart press the Escape key on the keyboard, or click on any blank space on the screen.
 |
>> To create a new natal or event chart
To create a new natal, event or transits chart select either:
•Current Transits (Here and Now)
Once the "Select" button in the chart details area has been clicked, clicking on the Current Transits item in the dropdown menu creates a chart for the Home Location for the current time. This chart will by default be an "Event" type of chart.
Once the "Select" button in the "chart details" area has been clicked, clicking on the New Chart item in the dropdown menu opens the "New Natal Chart" dialog.
1)Values for the fields are automatically pre-selected so creating a new chart is potentially fast and super easy. The pre-selections are simply the same values used in each field for the last chart that was created. You can overwrite these pre-selected values if you need to - just type in something different. You can also give the chart a type – either "Male", "Female", "Event", or "Horary" or just leave it as "Unspecified" (the default).
2)See below for more information on entering the chart's details.
3)You can freely type in the Comments box - and just like in a word processor, press the Enter key to create a new line.
NOTE: We suggest you assess the accuracy of the birthtime of the chart according to the Rodden Rating system and enter the chart's rating along with any of the chart's comments. AA, A, and B Rodden Ratings are deemed acceptable for research and readings. C stands for “Caution,” since the proper source is missing.
AA |
Accurate data from birth certificate, civic record or written family source |
A |
Accurate as quoted by the person, kin, intimate friend or associate |
B |
Biography or autobiography |
C |
CAUTION, no source. Undocumented data, an ambiguous quote or a source that has not proven credible |
DD |
Dirty data: unreliably documented or needs more research surrounding the source, or two or more unsubstantiated quotes etc. |
4)When you've finished entering the details for the new chart, click on the Calculate button in the bottom right corner of the dialog, which will close the dialog box and display the chart in the "Viewing Area".
 Creating a chart |
For the date you may optionally enter "NS" or "OS" as a suffix to the date to force date period recognition. If you don't do this Astro Gold assumes that the dates that you enter...
•on or before 14th October 1582 are in the old style (OS / Julian) calendar.
•on or after 15th October 1582 are in the new style (NS / Gregorian) calendar.
The Gregorian calendar was not adopted everywhere at the same time. Sometimes dates after 15th October 1582 are given in terms of the old style calendar (often followed by the initials "OS"). Also, some sources convert pre 1582 dates to new style dates (often followed by the initials NS).
>> To enter calendar dates expressed out of period
➢ If you wish to enter a date on or after the 15th October 1582 which is expressed as an old style date, then add the suffix “OS” to the entered date (e.g. 17 Dec 1723 OS). This will be autocorrected to display the corresponding date in the new style calendar.
➢ If you wish to enter a date before the 15th October 1582 which is expressed as a new style date, then add the suffix “NS” to the entered date (e.g. 7 Jan 1503 NS). This will be autocorrected to display the corresponding date in the old style calendar.
•For "Ctry/State" and "Place" you can also click on the  icon at the right of either field which opens the "Select Atlas Entry" dialog box. In this dialog you can select a country/state or place off a list, or alternatively search for what you want, by typing a full or partial country name into the Search field, for example "Aust" would jump to Australia, Austria etc. If the place you are looking for is shown select it then click the Select button.
 Search for and Select a state or country |
Alternatively if you know the place you are looking for is close to another place that is shown (place2) then click on that other place (place2) to highlight it.
Then click on the Nearby button to search for places that are in the local vicinity of the place (place2) you have selected in the list. If any are found they will replace the original places in the Select Atlas Entry window.
If the place you are looking for is in this list click on the Select button to use it. If not, you can continue this process of drilling down by clicking on a place in this secondary list that is close to the one you want, then clicking on the Nearby button again. You can continue to search in this way until no more places are found. Once you eventually find the place you want to use click on the Select button.
 |
Duplicate Names
Atlas lookups now detect places with duplicate names and if so then Astro Gold prompts you to choose which one.
Using State Abbreviations
In the Search field, if relevant you can enter a Place followed by a comma then a State abbreviation e.g. "Sydney, NSW". In a country that has states this may be helpful if two places in different states have identical names. However if the state abbreviation entered clashes with any country name or abbreviation in the main atlas, then this will take precedence. So for example, "Adelaide, SA" searches in Saudi Arabia, and you would have to choose "Adelaide, Australia" to find it in the Australian state of South Australia (SA).
GE is Georgia the Country.
GA (or Georgia) is the State in the USA.
Quick Place Selection
A shortcut method of selecting a place can be accessed by clicking on the Place button. When you do this a menu pops up allowing you to:
•Add the current Place to a list of "Favorite" places
•Select a Place off the list of "Favorite" places
•Select a Place off a list of "Recently Used" places
•Select the Home place (set in Preferences, Home tab)
NOTE: This shortcut menu is available wherever you need to enter a place, although the button may be named differently. For example in Subsidiary Charts, for Secondary Progressions using the "Other" Location the button is labeled "Select".
When creating or editing a chart usually the timezone is entered automatically for you, based on the country/state and place you've selected, but if you wish you can enter a different timezone in this field.
>> To create a Subsidiary Chart
Once the Select button in the "Chart Details" area has been clicked to display the chart selection options, clicking on the Subsidiary Chart item in the dropdown menu opens the "Subsidiary Chart" dialog box where you can create a new chart that is derived from any of the currently selected charts. The selected chart that the subsidiary chart is derived from is called the Base Chart. The default Base Chart is always the first natal type chart in the "Selected Charts" pane.
The different methods available for casting subsidiary charts are listed in the dialog box. Click on a method to select it. The new subsidiary chart will be given a chart type reflecting the kind of method used to create it e.g. for a solar return chart the subsidiary chart type will be "Solar Return".
Once you have entered the Time and Location details click on the Calculate button in the bottom right corner of the dialog to cast the subsidiary chart (using default values for any options associated with that method), and you will be returned to the Main Screen with the subsidiary chart displayed. For more detailed information on using each method and selecting its options see the instructions below.
To quit from the "Subsidiary Chart" dialog without creating a chart click on the Cancel button in the bottom left corner of the dialog.
NOTE: This section describes how to create subsidiary charts manually. Once you are familiar with what how to do this, see here if you are interested in automating this process.
 Creating a subsidiary chart |
If there is more than one chart selected in the "Selected Charts" pane the Base Chart (from which the subsidiary chart will be derived) can be chosen from any of these selected charts by clicking on the  icon at the end of the Name textbox. However, regardless of which chart is chosen to be the base chart, the newly cast subsidiary chart always replaces the chart in the chart position (1, 2, 3 or 4) for which it was selected.
 Selecting a subsidiary base chart |
1.Select which dynamic method you want to use from the list in "Method Selections".
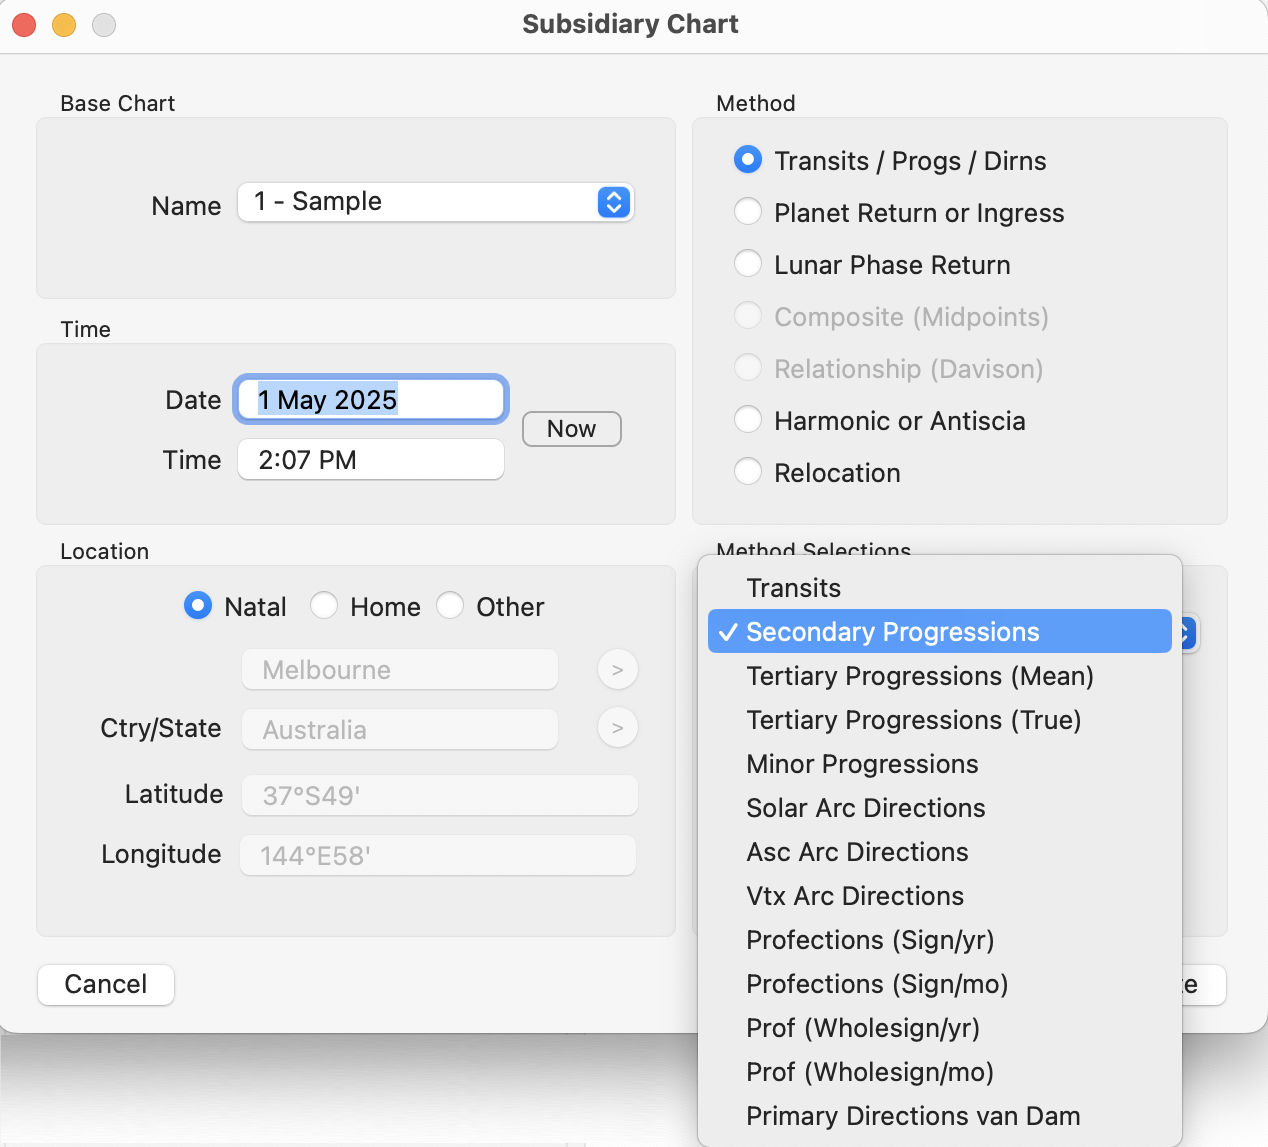 |
2.Enter the Date and Time for the dynamic chart.
3.Select the Location type - Natal, Home or Other.
a)If you select Natal the natal country and place will be automatically used.
b)If you select Home the location fields will be automatically filled in with the country and place defined for your home in "Preferences".
c)Otherwise select Other and type in the country/state and place and if Astro Gold can find them in the Atlas the latitude and longitude will be automatically filled in. Alternatively click on the to the right of these fields and select the country/state and place from the Atlas yourself.
4.Click the Calculate button in the bottom right corner of the dialog to cast the transits chart, and then you be returned to the Main Window.
NOTE: Many people may be familiar with the use of Progressions and Directions when creating subsidiary charts for a radix chart, but using Profections may be new to most. See Astro Sheets to learn more about what profections are and how they work.
1.Enter the Date and Time for the planet/point's Return or Ingress. You can click on the Now button to automatically update these fields to the current date and time.
2.Select the Location in the same way as for Dynamic Method above.
3.In the "Return Selections" section, from the Point list, select a transiting point to calculate as returning
4.For the point chosen above, in the To Position list, select the chart position you want to calculate the point's return to:
a)Its own natal position
- or an Ingress (entry) into one of the following signs:
b)Aries
c)Taurus
d)Gemini
e)Cancer
1.Relative to the date and time you entered (above), select which Return or Ingress you want to calculate:
a)The current return or ingress i.e. the one that has most previously occurred
b)The return or ingress that is nearest to the date and time you entered (that will be either the one that has most previously occurred, or the one that will occur next)
c)The one that will occur next
6.Once you have completed the above click on the Calculate button in the bottom right corner of the dialog to cast the return or ingress chart, and then you be returned to the Main Window.
You can use this option to get differing information, either a lunar phase return for the natal or event chart, or general information about the moon, both for any point in time
The lunar phase is the distance in degrees and minutes between the Sun and Moon in the natal or event chart, starting the counting from the position of the Sun. A lunar phase return occurs whenever the Sun and Moon are the same distance apart in the zodiac at any other point in time; this will occur once a month. This subsidiary option searches for this specific phase between the transiting Sun and Moon when it is in the particular relation (current, nearest or next) to the date and time you enter.
The general information you can obtain is when the Sun and Moon are in various other phases (not necessarily the same as the phase in the natal or event chart). For instance you can search for when the Sun and Moon are in a New, 1st Quarter, Full or 3rd Quarter moon phase, or for a phase angle that you specify.
1.Enter the Date and Time for the Lunar Phase (Return) chart. You can click on the Now button to automatically update these fields to the current date and time.
2.Select the Location in the same way as for Dynamic Method above.
3.In the "To Phase Angle" dropdown box, select from one of the following:
a)Return to Natal
b)New Moon
c)1st Q Moon
d)Full Moon
e)3rd Q Moon
f)Alternatively select [Enter Phase Angle here] and then delete that text entirely and type in the phase angle you are interested in e.g. 34
4.Once you have completed the above click on the Calculate button in the bottom right corner of the dialog to search for the radix lunar phase return, or mundane lunar phase, and be returned to the Main Screen.
If you have selected two natal charts then combining them is possible.
Two methods for combining charts are offered: the Composite method or the Relationship method.
NOTE: All combined charts are sometimes referred to as "composite" charts but as explained above this is simply one of the methods of creating a combined chart.
Composite (Midpoints)
This method uses the midpoint of the shortest arc joining each chart point, angle and house cusp within the two base charts. This then becomes the position of that point in the new chart.
When calculating any type of combined charts, Astro Gold first determines the composite longitudes, and then determines the composite right ascensions separately. Thus any right ascensions for a composite chart in Astro Gold are true composite right ascensions rather than right ascensions of composite longitudes.
Relationship (Davison)
This method calculates a new chart as if it was a natal chart for the midpoint in time, latitude and longitude of the two base charts.
1.Select the combining method you want to use (Composite or Relationship).
2.Select the Base chart and the Additional chart.
3.Click the Calculate button to cast the combined chart and return to the Main Screen with it displayed in the Viewing Area.
(The combined chart will replace the currently selected chart, it doesn't become an additional selected chart.)
1.After having clicked on the "Harmonic or Antiscia" method, decide what type of transformation to perform on the Base chart by making a selection off the Transform Type dropdown list.
a)Fixed Harmonic
b)Age Harmonic
c)Age+1 Harmonic
d)Antiscia
e)Contra-Antscia
f)Duads (Portman)
Duads (or Dwads) take astrological precision to a whole new level by dividing each zodiac sign into 12 mini-sections within each house, each ruled by a different sign. This ancient yet powerful technique offers a finer lens on personality traits, strengths, and challenges—allowing you to uncover hidden nuances and gain deeper astrological insight
i.This uses the same calculation as the Vedic D12 Dwadashamsha, also sometimes called Dodecatemoria.
ii.Duads allows any user-selected equal house system (such as whole sign houses) to be inherited from the base chart. If the base chart does not already use an equal house system, then the standard equal house system is automatically applied instead.
2.If you selected the 'Fixed Harmonic' type of transformation, select the harmonic required off the Harmonic Number dropdown list.
3.Once you have completed the above click on the Calculate button in the bottom right corner of the dialog to cast the Harmonic or Antiscia chart, and be returned to the Main Screen.
NOTE: Any user-selected equal house system (such as whole sign houses) will be inherited from the base chart. If the base chart does not already use an equal house system, then the standard equal house system is automatically applied instead
1.If more than one chart has been selected, in the Name list choose the chart to be relocated.
2.In the "Location" section, enter the new location to relocate the chart to.
3.Click on the Calculate button.
>> Automated Subsidiary Chart creation
It's possible to fully automate the generation of subsidiary charts for a radix (natal or event) chart in the Chart 1 position. Rather than populating Charts 2, and/or 3, and/or 4 with subsidiary charts manually, as descibed above, you can tell Astro Gold how you would always like it done, then at the click of a button have it automatically done whenever you want.
This functionality can only be accessed in the Chart 1 position via the "SubSid Wheel Automator" button, which is between the "Saved" and "Select" buttons in the Chart Details area within the Selected Charts pane, on the Main Screen (see Screen Areas for more info).
The dialog that drops down the first time you click on the SubSid Wheel Automator button is shown below.
|
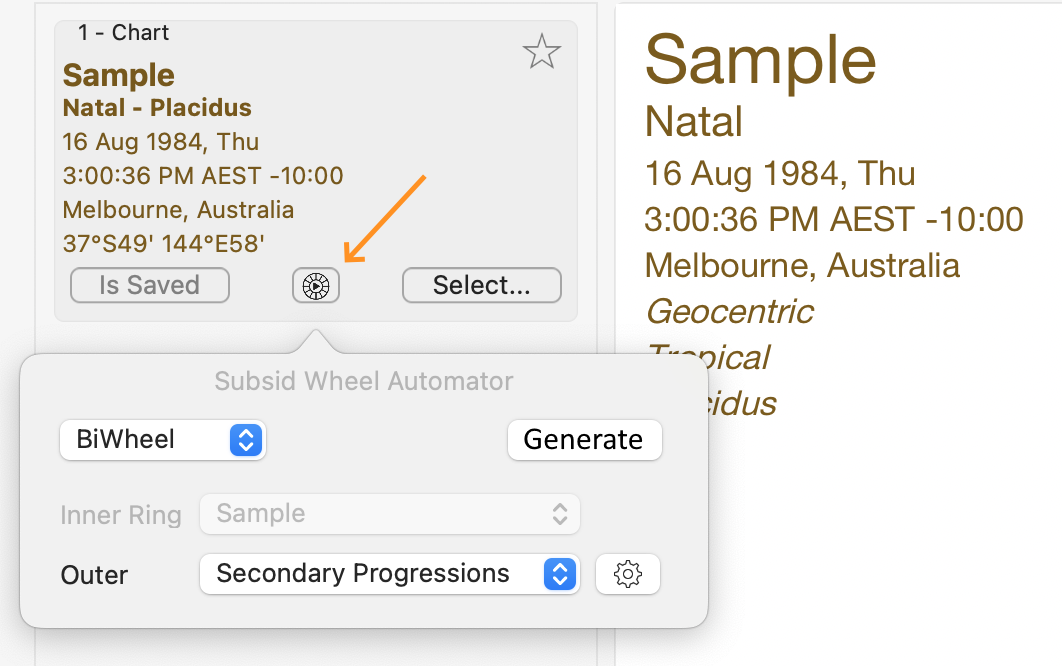
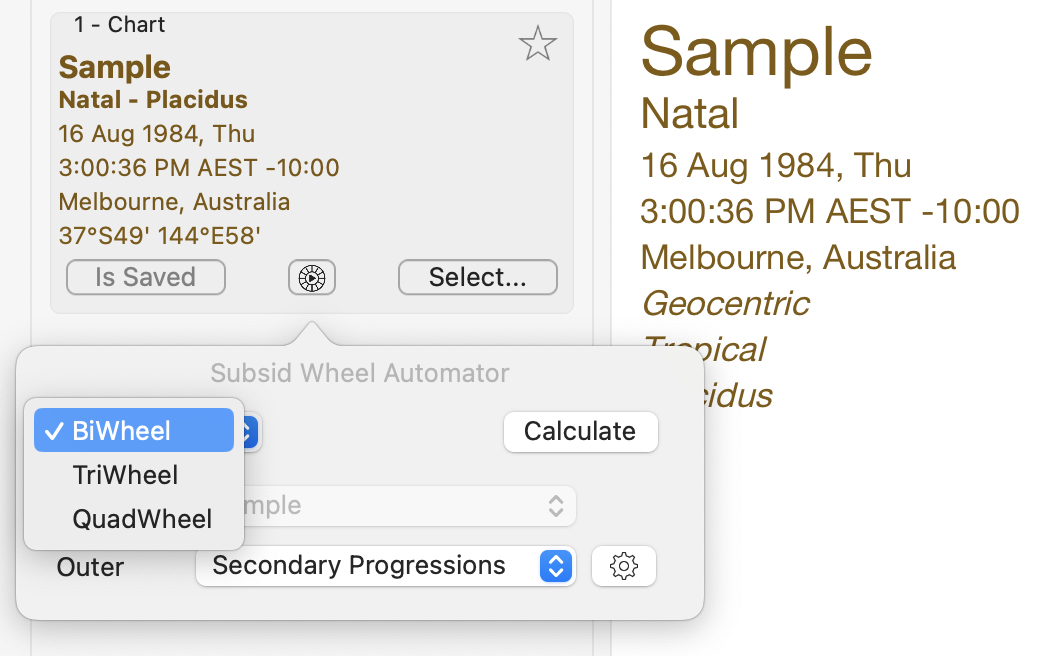
1)Decide which wheels you want to display subsidiary charts in by selecting an option from the top left dropdown.
a.To display the radix (natal or event) chart and one subsidiary chart, in the Chart 2 position (i.e. the first two wheels are used) - choose BiWheel. This is the default pre-selected option when you first use the Subsid Wheel Automator (as shown in the graphic above).
b.To display the radix (natal or event) chart and two subsidiary charts, in the Chart 2 and 3 positions (i.e. the first three wheels are used) - choose TriWheel.
c.To display the radix (natal or event) chart and three subsidiary chart in the Chart 2 , 3 and 4 positions (i.e. the all four wheels are used) - choose QuadriWheel.
|
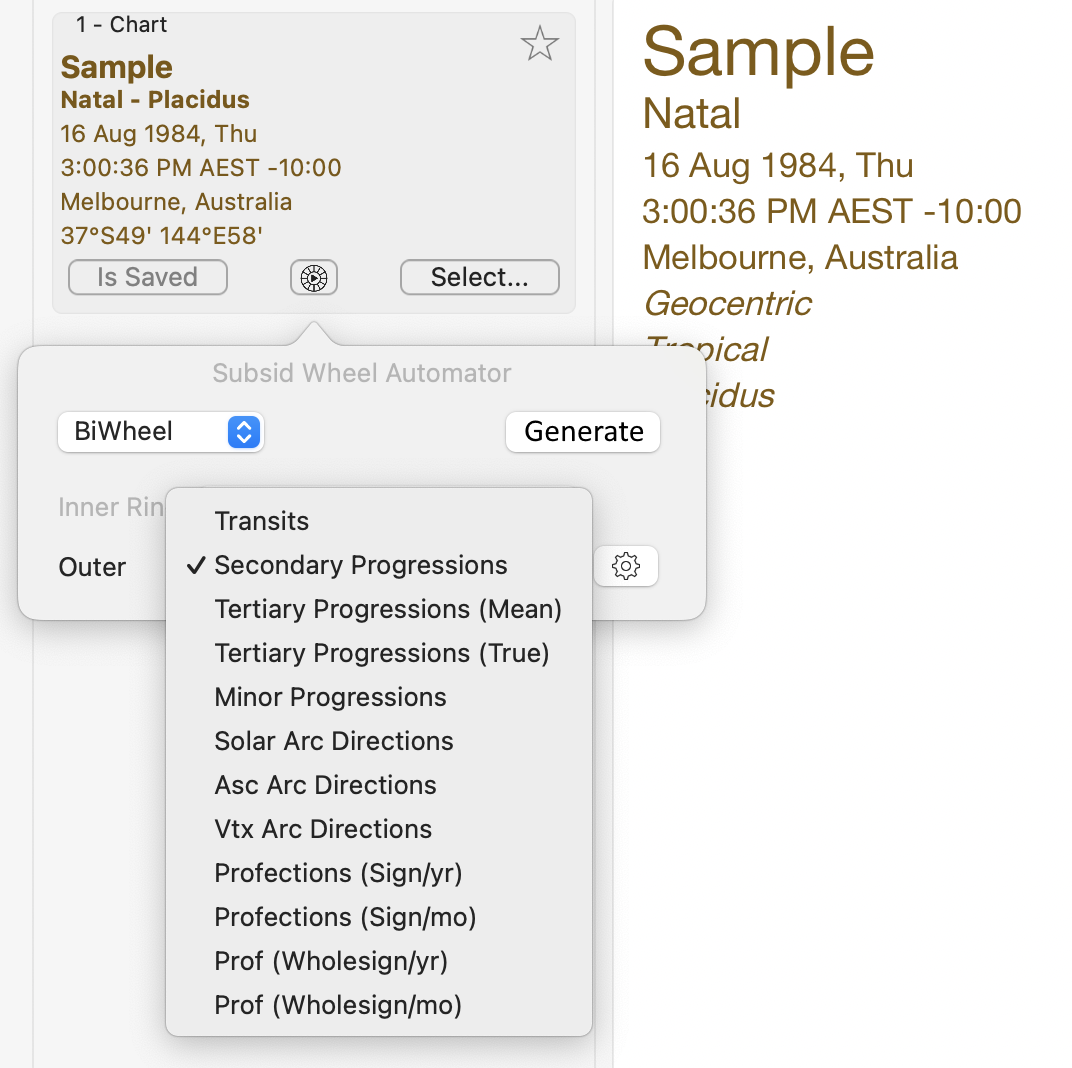
2)Once you have chosen BiWheel, TriWheel or QuadriWheel you can select what kind of subsidiary chart you want in each wheel.
A Ring dropdown will be displayed for each wheel that will have a subsidiary chart in it:
•A BiWheel will have an "Outer" dropdown
•A TriWheel will have "Middle" and "Outer" dropdowns
•A QuadriWheel will have "Mid-Inner", "Mid-Outer" and "Outer" dropdowns.
The subsidiary chart options are displayed when you click on any of the Ring dropdowns ("Mid-Inner", "Mid-Outer", "Middle" or "Outer"). Select the subsidiary chart type for that ring.
|
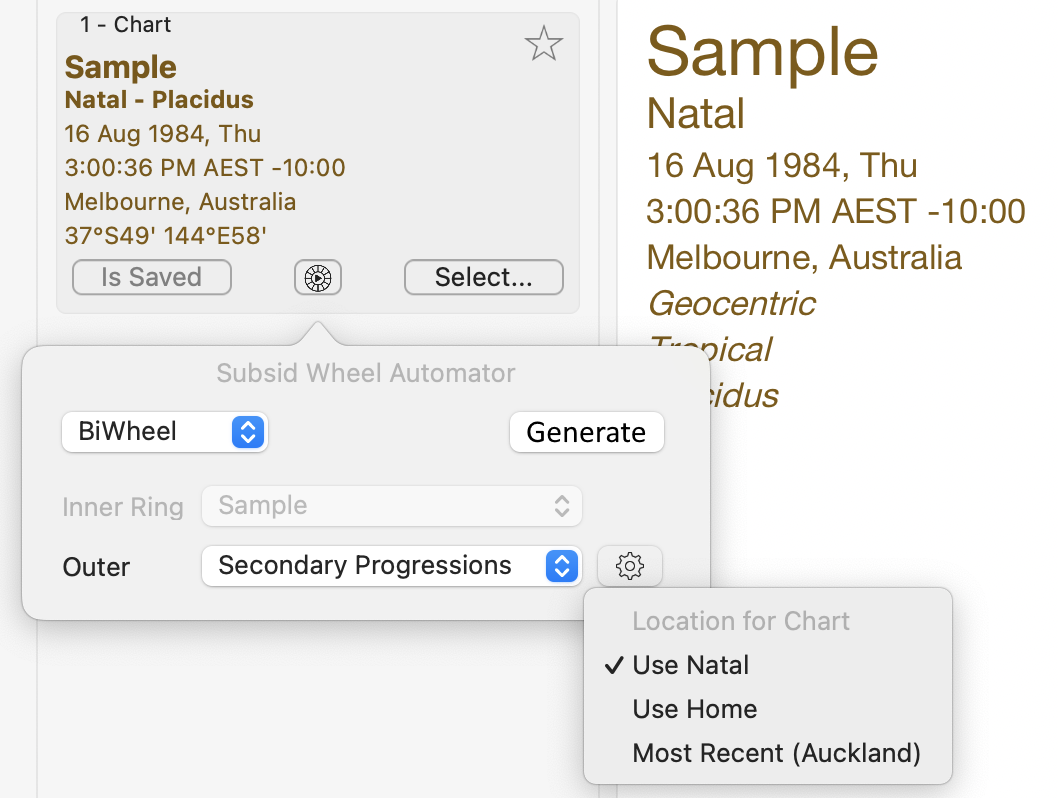
3)Then choose the location to base each subsidiary chart on. You can do this using the Gear icon to the right of each Ring dropdown, as shown below:
|
|
4)Finally, click on the Generate button to display the subsidiary chart(s).
5)If you don't subsequently want to change the type of chart used or the location option for any of the rings, then you can go straight to the Generate button, and click on it to immediately display the current subsidiary charts for whatever natal or event chart is selected in the Chart 1 position.